Once again, I am amazed at the diligence and ability in these classes. We are well on our way to having a wonderful exhibition. Counting down now - I am putting together a list of workshops to advertise for the daytimes during the exhibition, and we are all purposefully working towards our 'to do' list.
Keep those flowers coming - remember now, if you are making i-cord stems to have wire inserted so they can stand up in the 'garden' you need to cast on 5 stitches, so the opening is wide enough.
We are STILL waiting delivery of the bugs and insects book from Amazon, as is the library! In the meantime, keep up the leaves, flowers and other things. Sian's praying mantis is looking amazing, and we have ladybird, butterfly, caterpillar and bee patterns if you want them.
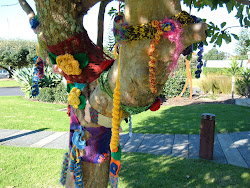
A couple of new photos today - we did a little bit of yarnbombing outside the education room. A lovely scene, with the Estuary, the Tai Chi class and the 'dressed' trees - (just a pity about the ugly prefabs next door).
More connections discovered tonight - we all know someone... scarey. Lovely fun and laughter - keep it up.
KIP 2012
Wednesday, March 30, 2011
Friday, March 25, 2011
Counting down
Things are getting exciting as we look at the details for the exhibition. We have a couple of new knitters who will be starting soon - the more the merrier! Sharleen's group are enthusiastic and may even arrive en masse to one of our classes to share what they are doing. I've been going around the Arts Centre and working out how to hang things and where it will all go. We will have 3 days to play around and get it right, so hopefully that will be enough!
I have ordered a book (for a change!) '75 birds, butterflies and little beasts to knit and crochet' - it should arrive very soon. When it does we will be working on those, in all sizes as we need small ones for the 'garden', medium sized versions for the sculpture garden area and very big ones for the wall near the big window where my monster spider web will go!
Barbara D brought parts of the scarecrow she is making for the sculpture garden - he's looking wonderful. Gillian's monster handbag looks like it will be another highlight.
Our session this week will be a bit of light relief as we tie new pieces to the trees outside the Centre, as well as continuing with our ongoing pieces. For those who want to do some more of the other things we have learned, I will bring my tunisian hooks and the patterns for you to try. And of course more wool!
Thursday, March 17, 2011
New input for the exhibition
Yesterday I met with Sharleen Greer from Warkworth. Wow! - in every sense of the word. Sharleen has had crocheted and sewn articles accepted for local and national competitions, with her Barbie dress that was in the WOW - World of Wearable art awards being a special highlight. She has been teaching freeform crochet, especially the Pru Mapstone-style bagmaking, and she co-ordinates local knitting, crochet and yarnbombing groups. So exciting! We 'clicked' immediately - kindred spirits! She is going to be involved in 'Knitcetera' and is also going to carry the message to her group next week, so they can plan some items to include too. The most exciting part of the discussion was that she will allow her range of knitted and crocheted wearable art to feature. Fantastic.
Wednesday, March 16, 2011
Lesson 6 - scarves
We learned this week that scarf knitting need not be boring! We tried a range of techniques, focussing on chevrons and entrelac. There are really no limits to the patterns, designs, lengths, twists and turns for scarf-making. The chevron design was frustrating when in a group of laughing, chatting knitters! But we have now worked out the easiest version of this very effective design:
CHEVRON: Cast on a multiple of 13, plus 2 extra (so you will need either 15, 28, 41 or 54sts) The pattern is based on only 2 rows, ROW 1: K2, Make 1 [M1] (by lifting the loop in front of the next stitch and knitting through the back of it), k4, sl 1, k2 tog, psso, k4, M1. Repeat all this until you get to the last 2 sts, k2. ROW 2: Either knit or purl, depending on the effect you want - garter stitch - knit; stocking stitch - purl. THAT'S IT!
Watch out for - the way you make your stitch. If you knit into the front of the picked up loop it will form a little hole. Although, so long as you always do the same thing, this makes a lovely pattern. You can also M1 by knitting into the front then the back of the next st.
And we found - especially when distracted - it's easy to just sl 1, k1, psso (pass the slipped stitch over) rather than knitting the 2 together in the middle. You'll only realise you've done this when you get to the end of the row and have stitches left over!
I'll put some info re entrelac here later - it's a lot more complicated, although has a rhythm, so once you learn that, you're away.
Some more photos today - some fantastic work happening. And we had some great ideas too - watch this space!
Wednesday, March 9, 2011
Lesson 5: Flowers
Brilliant lessons this week. We started by learning how to make i-cord. This looks like the tail of French Knitting and is made on dpns (double pointed needles). The usual size is 3, 4 or 5 stitches. The main thing to remember is that the work is NEVER turned. You knit the stitches, then slide them to the other end of the dpn, then pull the wool firmly across the back of the stitches, then knit again, as before. Then of course, just to confuse everyone, we added a little leaf - knitted in the traditional way, by turning the work at each row! Much laughter, but some lovely work ensued.
Next, we made little windmill-shaped flowers with separate petals, knitted one after the other, keeping them joined at a central stitch. We discussed whether nature makes 6-petalled flowers, and it seems - according to several - that flowers are always odd-number petalled! Anyway, we made a variety of flowers, with 5, 6 (yes!), or 7 petals. All looked great. The texture and size varied greatly, depending on the fibre and needles used.
Some people then managed to crochet a simple rolled rose-type flower. See instructions and examples. I have also included another simple knitted rose pattern. And this week, I have again managed to post some photos! Scroll right down to see some fantastic work so far. We have some wonderful things appearing for the exhibition. Keep it coming, I say. :)
Sunday, March 6, 2011
Planning the exhibition
Counting down to the exhibition at the Estuary Arts Centre in Orewa. The opening is Thursday evening, 09th June and the exhibition closes Sunday 03 July.(Not quite a month, I realise!) We are discussing each specific area of the centre with ideas for what people will produce to fit each space. People have some wonderful ideas, and all are very busy on something or other! As well as those enrolled in my knitting classes on Wednesdays, there are also others interested in participating - individuals and groups. It's so exciting and I am keeping in touch with people and setting up times, etc for discussing what they will provide, when and where it will be displayed.
One of the interesting things will be how to display these items - it would be too expensive to frame or similarly treat most of the pieces, so we have to be creative in our display as well as in the overall design.
The spaces are each quite different, presenting some wonderful opportunities to do different things in each area, and in some places, a range of things. I will take some photos regularly now to demonstrate what will go where - as I make the final decisions. I am very happy with the overall fluidity of the process - it is very much a collaborative work now. Keep it up all you wonderful people! It's great how everything is coming together and the spaces that lend themselves to a specific treatment just seem to let us know - and I am planning accordingly.
For those who are unsure what to make now - remember to check in with me - but as a broad guideline, we need: fish, birds and related seaside items for upstairs; bugs, butterflies, etc for the wall high up in the cafe; rectangular and/or square pieces for the small windows up the stairs; flowers, leaves and insects for the 'garden' Sian is organising downstairs; table embellishments and 'food' for Barbara D's afternoon tea setting.
All the weekly samples will be being used in a 'knitting circle' exhibit in the main foyer, and other items are able to be incorporated in some of the other areas. All suggestions and ideas still being gratefully accepted and discussed as possibilities - keep them coming!
I want to reassure everyone - I am writing everything down and keeping a record of it all - as if you even doubted it! :)
Friday, March 4, 2011
Blankets for Christchurch
Check out this link: http://www.facebook.com/BlanketsForChristchurch It's a group in South Auckland. They are asking for 20cm x 20cm squares in knitting or crochet of any style to be made into blankets to send to Christchurch. What do we think?
Thursday, March 3, 2011
This week's email: 04 March 2011
Hi all
I hope you are practising the crocheted granny squares! If you’ve checked out the blog you’ll see I visited the local Spinners & Weavers’ group meeting this week and was amazed to find they are also learning to crochet the same square as us! The other thing you’ll see is that I managed to delete the photos on my camera before I downloaded them – duh! Will sort that out with a LOT more next week. I have refined the granny square pattern and will include it here.
Our next lesson, on Wednesday 09th March, will be ‘flowers’ – of all kinds. If anyone has patterns, books, examples of flowers either knitted or crocheted, please bring them along to share. I will have some patterns for you and we will practise some simple ones on Wednesday. I think we can safely say that Barbara Dobson, who attends our morning clases, is our resident flower expert, but others are learning well too – and Sian’s sunflowers are becoming a real feature.
Remember Olek – the crocheter who covered the New York bull on Wall Street in her pink ‘camouflage’? Check out what she’s just done with flowers at this site http://www.boweryboogie.com/2011/02/olek-hoists-yarn-flower-atop-358-broome/ and click on this one to see the Ladies Fancywork Society’s work in Denver http://handsindelight.com/2010/07/14/crochet-graffiti-in-denver/
If you want to investigate some flower patterns before Wednesday, click here http://www.squidoo.com/flowerknittingpatterns and scroll down to click on ones you fancy. This is also a brilliant site: http://knittingpatterncentral.com/directory/flowers.php and here is one with a range of crocheted flower patterns: http://www.allcrafts.net/crochet/crochetflowers.htm
See you next time,
Jennifer J
Wednesday, March 2, 2011
Serendipity
How's this for a laugh - talk about coincidence: I popped in to the gathering of the Spinners & Weaver's group at the Whangaparaoa library today to update them about the exhibition and they showed me what they'd all been learning recently - crocheted granny squares! The same pattern as ours - they are one step ahead though, learning how to put them together with one continuous seam. Great stuff.
I spoke to them about the possibility of their running some workshops during Knitcetera. They were interested in sharing some spinning, and yet another different form of knitting - broomstick knitting. Wonderful!
The Tunisian knitting is also very popular - as evidenced by yesterday's lessons - so I will definitely do one or two on that.
Lesson 4 - crochet & Tunisian
What a fantastic lot you are! We had some fun today - again. Some people struggled, but the results have been brilliant! Most of the people in all three classes chose to try the granny squares - despite the pattern being challenging! I have rewritten the pattern and will post it here as well as including it with this week's email.
BASIC GRANNY SQUARE TO CROCHET
To start: Ch4, join with a slip stitch to form a ring.
Round 1: Ch3, 2dc in ring, ch2, (3dc in ring, ch2) 3times for corner.
Join to top of starting chain with a sl st.
Cut yarn & tie off.
Round 2: Join new colour at any ch2 space.
Ch3, in same space work 2dc, ch2, 3dc (this is your starting corner).
Ch1, (in next ch2 space work 3dc, ch2, 3dc, ch1) 3 times.
Join to top of starting ch with a sl st.
Cut yarn, tie off.
Round 3: Join new colour at any ch2 space.
Work starting corner as before = Ch3, in same space work 2dc, ch2, 3dc .
Then *ch1, 3dc in next ch1 space, ch1.
In next sp work 3dc, ch2, 3dc (corner).
Repeat from * 2 times more.
Ch1, 3dc in next ch1 space, ch1
Join to top of starting ch with a sl st.
Cut yarn, tie off.
Round 4: Join new colour at any ch2 sp,
Work starting corner as before = Ch3, in same space work 2dc, ch2, 3dc .
Then *(ch1, 3dc in next ch1 sp) 2x.
Ch1, work corner in next corner space = 3dc, 2ch, 3dc.
Rep from * 2x more, (ch1, 3dc in next ch1 sp)2x, ch1.
Join to top of starting ch with a sl st.
Cut yarn, fasten off.
For a larger square, continue to work around the piece in the established pattern, which is 3dc, 2ch, 3dc in each corner and 1ch, 3dc, in each space at the side of the square, with 1ch between the last 3dc group and the corner group. Make one more 3dc group between corners in each round.
Some people tried the tunisian knitting - also known as tunisian crochet, afghan knitting or tricot. It's so much fun - we must revisit it sometime.
Everyone is working away at the things for the exhibition with some great work happening - so exciting!!
Subscribe to:
Posts (Atom)

Irish Hiking Scarf

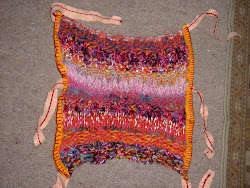
Seagardens Aotearoa

Large Seagardens Aotearoa piece


FOR THE EXHIBITION
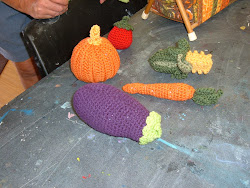
Edith's veges


Detail of Gillian's seascape

Christine's stilt

Sally's work

Edith's toadstools

Well done Christine!

Kaywin and Jan's bunting

Scarecrow

Jennie's roses

Elaine's birds made with sock wool

Gillian's monster flower

more fruit from Sally

Sally's veges

Gillian's starfish -back

Edith's fish

Sally's dolphin

Sian's flower

Gillian's paua
Robyn's sunset-inspired piece

Jennie's hats

Barbara T's crochet